网络相关的配置,操作等
常用命令
ifdown wan; ifup wan
cat /proc/net/nf_conntrack 查看链接
iptable
filter nat mangle raw security
iptables -t nat -L input_rule -n -v –line-numbers
iptables -D input_rule 2
iptables -F input_rule
iptables -t nat -A POSTROUTING -s 172.22.22.0/24 -d 192.168.1.0/24 -j MASQUERADE
iptables -I FORWARD 1 -s 192.168.1.100 -p udp –sport 30000:40000 -j DROP
wireguard
 1sudo apt install wireguard
 2sudo sed -i 's/.*net\.ipv4\.ip_forward.*/net.ipv4.ip_forward = 1/' /etc/sysctl.conf
 3sysctl -p
 4cd /etc/wireguard
 5wg genkey | tee server_privatekey | wg pubkey > server_publickey
 6wg genkey | tee client_privatekey | wg pubkey > client_publickey
 7
 8echo "
 9[Interface]
10PrivateKey = $(cat server_privatekey)
11Address = 10.0.8.1/24
12PostUp   = iptables -A FORWARD -i wg0 -j ACCEPT; iptables -A FORWARD -o wg0 -j ACCEPT; iptables -t nat -A POSTROUTING -o eth0 -j MASQUERADE
13PostDown = iptables -D FORWARD -i wg0 -j ACCEPT; iptables -D FORWARD -o wg0 -j ACCEPT; iptables -t nat -D POSTROUTING -o eth0 -j MASQUERADE
14ListenPort = port
15# DNS = 1.1.1.1
16[Peer]
17PublicKey =  $(cat client_publickey)
18AllowedIPs = 10.0.8.100/32 " > wg0.conf
19> eth0 根据情况适配,一定是当前使用的网卡的,否则无法访问局域网内的其他设备
20> 如有线、无线切换的时候注意更改
21> NAT port1 -> port2
22
23sudo systemctl enable wg-quick@wg0
24# 启动WireGuard
25wg-quick up wg0
26# 停止WireGuard
27wg-quick down wg0
28# 查看wireguard服务端运行状态
29wg
30
31echo "
32[Interface]
33  PrivateKey = $(cat client_privatekey)
34  Address = 10.0.8.100/32
35  DNS = 1.1.1.1
36[Peer]
37  PublicKey = $(cat server_publickey)
38  Endpoint = ip:port
39  AllowedIPs = 10.0.8.0/24, 172.22.22.0/24
40  PersistentKeepalive = 25 " > client.conf
41
42
43sudo ufw allow port/udp
44sudo ufw allow ssh
45sudo ufw enable
46sudo ufw status
47
48# 测试端口
49nc -u IP port
50
51grep "Failed password" /var/log/auth.log
openwrt
 1opkg install wireguard-tools kmod-wireguard luci-proto-wireguard luci-app-wireguard
 2
 3cat /etc/config/network
 4config interface 'wg0'
 5        option proto 'wireguard'
 6        option private_key 'xxx'
 7        list addresses '10.0.0.2/32'
 8        list dns '1.1.1.1'
 9
10config wireguard_wg0
11        option description '导入对端配置'
12        option public_key 'xxx'
13        list allowed_ips '10.0.0.0/24'
14        list allowed_ips '10.1.0.0/24'
15        option persistent_keepalive '25'
16        option endpoint_host 'domain.com'
17        option endpoint_port 'port'
18        option route_allowed_ips '1'
19
20cat /etc/config/firewall
21config zone
22        option name 'lan'
23        option input 'ACCEPT'
24        option output 'ACCEPT'
25        option forward 'ACCEPT'
26        list network 'lan'
27        list network 'wg0'
28
29# 防火墙配置all局域网设备通过 wg
30config zone
31    option name 'wg'
32    option input 'ACCEPT'
33    option output 'ACCEPT'
34    option forward 'REJECT'
35    option masq '1'
36    option mtu_fix '1'
37    list network 'wg0'
38
39config forwarding
40    option src 'lan'
41    option dest 'wg'
42
43# 防火墙配置部分设备通过 wg
44# https://openwrt.org/docs/guide-user/firewall/firewall_configuration
45
46config zone
47    option name 'wg'
48    option input 'ACCEPT'
49    option output 'ACCEPT'
50    option forward 'REJECT'
51    option masq '1'
52    option mtu_fix '1'
53    list network 'wg0'
54
55#config forwarding
56#    option src 'lan'
57#    option dest 'wg'
58
59config rule
60    option name 'allow_192_168_0_200/201_to_vpn'
61    option src 'lan'
62    option src_ip '192.168.0.200/31'
63    option dest 'wg'
64    option target 'ACCEPT'
NanoPi 2
cat /sys/devices/platform/board/info
- 板子信息查看
- 低版本内核准备的兼容实现
编译内核 make ARCH=arm nanopi2_linux_defconfig
编译 wireguard.ko
主要注意问题:insmode wireguard 如果有错误, dmesg 分析一下
- 依赖另外两个 ip6_udp_tunnel.ko udp_tunnel.ko
- 如果不想编译的话,可以 find /usr/lib/modules/$(uname -r) 下是否有ko
ddns
config.json
1{
2    "CFKEY":"xxxxxx",
3    "CFUSER":"[email protected]",
4    "CFDOMAIN":[
5        "xxx.yyy"
6    ]
7}
ShellCrash
在线安装:只是引用的文件源不同
0 3 * * 3 /etc/ShellCrash/task/task.sh 104 在每周3的3点整更新订阅并重启服务
0 3 * * 5 /etc/ShellCrash/task/task.sh 113 在每周5的3点整自动更新数据库文件
meta内核
    2-1   : 查看当前的内核
    2-1-3 : Tproxy模式
    2-1-7 : 3 劫持局域网+本机流量
    2-2   : 1 fake-ip  3 mix混合模式
    2-2-4 : 7 禁用DNS劫持,自定义dns服务器
    2-9   : Fake-ip过滤列表  /etc/ShellCrash/configs/fake_ip_filter
    4-1   : 允许ShellCrash开机启动
    5-7   : 自动保存面板配置 周3的3点整更新订阅  自动同步ntp时间
    6-1   : 订阅相关
    6-1-4 : 配置规则
    6-6-2 : 自定义规则  /etc/ShellCrash/yamls/rules.yaml
    9-4-2 : 面板  https://github.com/MetaCubeX/metacubexd  ui面板
    8-2   : 切换内核singbox
config
configs/ShellCrash.cfg
 1#ShellCrash配置文件,不明勿动!
 2versionsh_l=1.9.2beta4
 3firewall_mod=iptables
 4update_url=https://fastly.jsdelivr.net/gh/juewuy/ShellCrash@master
 5userguide=1
 6redir_mod=混合模式
 7cn_ip_route=已开启
 8dns_nameserver='https://223.5.5.5/dns-query, https://doh.pub/dns-query, tls://dns.rubyfish.cn:853'
 9dns_fallback='https://223.5.5.5/dns-query, https://doh.pub/dns-query, tls://dns.rubyfish.cn:853'
10Https=
11Url='https://|https://'
12cpucore=armv7
13crashcore=meta
14core_v=v1.19.11
15geosite_v=20250707
16mrs_geosite_cn_v=20250707
17china_ip_list_v=20250707
18china_ipv6_list_v=20250707
19Country_v=
20cn_mini_v=20250707
21hostdir=':9999/ui'
22# exclude='免费|计费'  url 编码
23exclude='%E8%AE%A1%E8%B4%B9%7C%E5%85%8D%E8%B4%B9'
24# 6-1-5 选取在线生成服务器
25server_link=1
26# 6-1-4 选取在线配置规则模版
27rule_link=1
fakeip
configs/fake_ip_filter
1snapdrop.net
2canyouseeme.org
3*.*.gov.cn
yamls
yamls/rules.yaml
1- DOMAIN,snapdrop.net,DIRECT
2- DOMAIN,stun.l.google.com,DIRECT
3- DOMAIN-SUFFIX,canyouseeme.org,DIRECT
4- DOMAIN-KEYWORD,spaceship,DIRECT
5- DOMAIN-KEYWORD,chatgpt,AiGpt
6- DOMAIN-KEYWORD,grok.com,AiGpt
7- DOMAIN-KEYWORD,reddit.com,AiGpt
yamls/proxy-groups.yaml
1  - name: AiGpt
2    type: fallback
3    url: 'https://chatgpt.com/favicon.ico' # 根据情况修改
4    interval: 300
5    proxies:
6      - 新加坡A02
7      - 新加坡A03 | IEPL | x2
clashverge
https://www.clashverge.dev/friendship.html
ax1800 pro
刷机
https://github.com/lgs2007m/Actions-OpenWrt.git
JDCloud-AX1800-Pro_AX6600-Athena.md


雅典娜需要T10梅花内六角带孔
拆机,上部螺丝,底部2层螺丝
拆散热片,拆天线
短接两点和地上电,输入com口,两次重连电脑之后(等3-5s), 回车继续,红灯亮起立马按reset,然后绿灯亮松开 是打开的ram中的uboot http://192.168.1.1/ ,先刷入2181降级获取ssh,刷uboot,后续可以自主更新固件
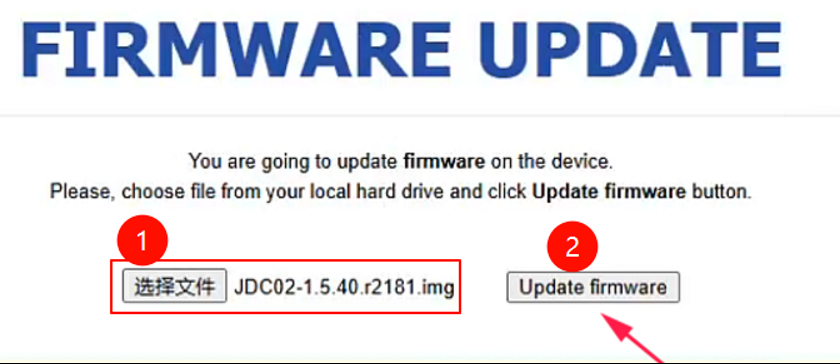
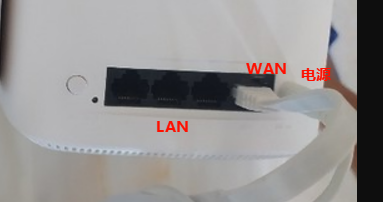
重新进入uboot,先按住reset然后上电,红色闪 变绿 http://192.168.1.1/ ,wan,lan口都可
- http://192.168.1.1/uboot.html 是可以直接刷入uboot的
上传之前的旧固件(2181)即可开启老固件ssh功能
可直接刷第三方固件
关led灯 echo 0 | tee /sys/class/leds/led_g1/brightness
恢复跑分
- 先op、startos安装sgdisk然后 最后一个分区有的话删除 fdisk d
- sgdisk -e -n 0:0:0 -c 0:storage -t 0:1B1720DA-A8BB-4B6F-92D2-0A93AB9609CA -p /dev/mmcblk0 新建分区,重启reboot
- 上传之后的备份文件24-26,刷回即可
- 刷原厂 存储设置内置存储为本地网盘,然后直接恢复出厂,智能加速服务
1dd if=/dev/zero of=$(blkid -t PARTLABEL=0:ETHPHYFW -o device) conv=fsync
2dd if=/mnt/mmcblk0p27/mmcblk0p24_plugin.bin of=$(blkid -t PARTLABEL=plugin -o device) conv=fsync
3dd if=/mnt/mmcblk0p27/mmcblk0p25_log.bin of=$(blkid -t PARTLABEL=log -o device) conv=fsync
4swapoff $(blkid -t PARTLABEL=swap -o device)
5dd if=/mnt/mmcblk0p27/mmcblk0p26_swap.bin of=$(blkid -t PARTLABEL=swap -o device) conv=fsync
6swapon $(blkid -t PARTLABEL=swap -o device)
ssh 刷 uboot
 1# WinScp上传uboot文件uboot-JDC_AX1800_Pro-AX6600_Athena-20240510.bin到tmp文件夹,然后SSH输入命令刷写uboot到0:APPSBL和0:APPSBL_1分区:
 2#
 3dd if=/tmp/uboot-JDC_AX1800_Pro-AX6600_Athena-20240510.bin of=$(blkid -t PARTLABEL=0:APPSBL -o device) conv=fsync
 4dd if=/tmp/uboot-JDC_AX1800_Pro-AX6600_Athena-20240510.bin of=$(blkid -t PARTLABEL=0:APPSBL_1 -o device) conv=fsync
 5# 输入命令检查分区md5 hash值,和我这版2024.05.10编译的md5一致即可:
 6
 7md5sum $(blkid -t PARTLABEL=0:APPSBL -o device) && md5sum $(blkid -t PARTLABEL=0:APPSBL_1 -o device)
 8# md5sum $(blkid -t PARTLABEL=0:APPSBL -o device) && md5sum $(blkid -t PARTLABEL=0:APPSBL_1 -o device)
 9# 5e1817f795ada48335fda9f22545a43e  /dev/mmcblk0p13
10# 5e1817f795ada48335fda9f22545a43e  /dev/mmcblk0p14
优化
- /sbin/jd_online_upgrade.sh,disable upgrade
- jd-firmware 权限 0
- /etc/dropbear/authorized_keys, 600, ssh-rsa
- iptables -L MINIUPNPD -v -n –line-numbers -t nat
- /etc/config/upnpd 配置黑名单没生效,/tmp/upnp.leases
- /opt/1.5.80.r2262 –> jd_h.sh
web服务
nginx: master process /usr/sbin/nginx -c /etc/nginx/nginx.conf -g daemon off;

/etc/nginx/nginx.conf
    include /etc/nginx/conf.d/*.conf;
usr\lib\lua\jdc_api_wrapper.lua
usr\lib\lua\jdc_joylink_local.lua
ubus list
ubus -v list jdcapi.static
ubus -v list jdcapi_app
ps | grep jdc

ubus call jdcapi.static set_hostname '{"hostname":";reboot;"}'
ubus call jdcapi.static set_iptv_info '{"enable":"1", "vlan_enable":"1", "vid":"99;", "priority":"0", "port":"1"}'

uci show
uci get jd_product.iptv_info.vid
刷机4533
 1// https://www.right.com.cn/forum/forum.php?mod=viewthread&tid=8461568
 2// 从Cookie提取sessionid(需要先登录路由器后台)
 3const sessionid = document.cookie
 4  .split('; ')
 5  .find(row => row.startsWith('sessionid='))
 6  ?.split('=')[1] || '';
 7
 8const apiUrl = '/jdcapi';
 9
10async function enableTelnet() {
11  if (!sessionid) {
12      console.error("未找到 sessionid,请先登录路由器后台!");
13      return;
14  }
15  console.log("检测到 Session ID:", sessionid);
16
17  try {
18    // 第一步:修改 Telnet 标志位
19    console.log("正在执行第1步:开启系统 Telnet 标志位...");
20    const step1Res = await fetch(apiUrl, {
21      method: 'POST',
22      headers: { 'Content-Type': 'application/json' },
23      body: JSON.stringify({
24        "jsonrpc": "2.0",
25        "id": 1,
26        "method": "call",
27        "params": [
28          sessionid,
29          "jdcapi.static",
30          "set_iptv_info",
31          {
32            "enable": "1",
33            "vlan_enable": "1",
34            "vid": "99; factory_hm info telnet 1;",
35            "priority": "0",
36            "port": "1"
37          }
38        ]
39      })
40    });
41    console.log('第1步结果:', await step1Res.json());
42
43    // 稍微等待一下,确保上一步生效
44    await new Promise(r => setTimeout(r, 1000));
45
46    // 第二步:启动 Telnet 服务
47    console.log("正在执行第2步:启动 Telnetd 服务...");
48    const step2Res = await fetch(apiUrl, {
49      method: 'POST',
50      headers: { 'Content-Type': 'application/json' },
51      body: JSON.stringify({
52        "jsonrpc": "2.0",
53        "id": 2,
54        "method": "call",
55        "params": [
56          sessionid,
57          "jdcapi.static",
58          "set_iptv_info",
59          {
60            "enable": "1",
61            "vlan_enable": "1",
62            "vid": "99; telnetd -F -l /bin/login;",
63            "priority": "0",
64            "port": "1"
65          }
66        ]
67      })
68    });
69    console.log('第2步结果:', await step2Res.json());
70
71    console.log("执行完成!请尝试 telnet 连接路由器。");
72
73  } catch (e) {
74    console.error('操作异常 (如果是第2步请求超时,通常意味着 telnetd 启动成功):', e);
75  }
76}
77
78enableTelnet();
ax1800
ramips mt7621
- 拆机,底部三个螺丝
- 串口在有三颗螺丝的铝块散热器下面
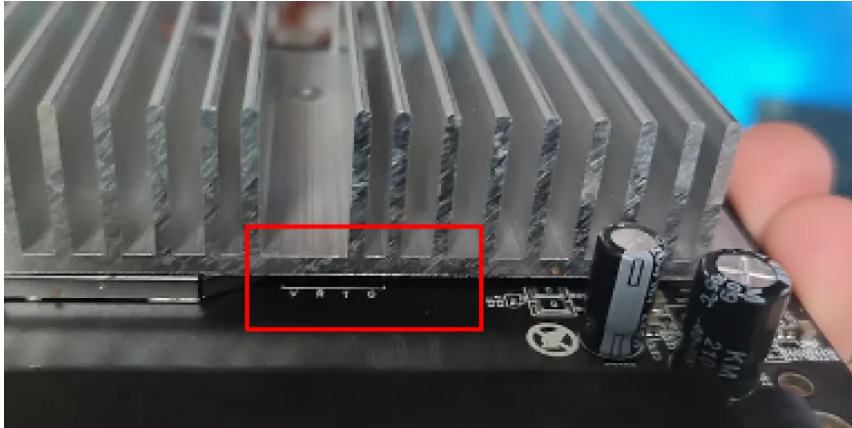
- 波特率115200
串口
U-Boot SPL 2018.09 (Sep 06 2022 - 22:06:27 +0800) Trying to boot from NOR U-Boot 2018.09 (Sep 06 2022 - 22:06:27 +0800) CPU: MediaTek MT7621AT ver 1, eco 3 Clocks: CPU: 880MHz, DDR: 1200MHz, Bus: 220MHz, XTAL: 40MHz Model: MediaTek MT7621 reference board DRAM: 448 MiB MMC: mmc@1e130000: 0 Loading Environment from SPI Flash... SF: Detected whxx25q128 with page size 256 Bytes, erase size 64 KiB, total 16 MiB OK In: uartlite0@1e000c00 Out: uartlite0@1e000c00 Err: uartlite0@1e000c00 Net: Warning: eth@1e100000 (eth0) using random MAC address - 5e:69:c8:f8:cf:5b eth0: eth@1e100000 Saving Environment to SPI Flash... SF: Detected whxx25q128 with page size 256 Bytes, erase size 64 KiB, total 16 MiB Erasing SPI flash...Writing to SPI flash...done OK disabled console and autoboot in 0 seconds ++++++++++++++upgradeFlag=rest gpio value=0 (Low Level effective) clock is disabled (0Hz) selecting mode MMC legacy (freq : 0 MHz) clock is enabled (49019Hz) selecting mode MMC legacy (freq : 25 MHz) mmc: widths [8, 4, 1] modes [MMC legacy, MMC High Speed (26MHz), SD High Speed (50MHz), MMC High Speed (52MHz), MMC DDR52 (52MHz), HS200 (200MHz)] host: widths [4, 1] modes [MMC legacy, SD Legacy, MMC High Speed (26MHz), SD High Speed (50MHz)] clock is enabled (25000000Hz) trying mode MMC High Speed (26MHz) width 4 (at 26 MHz) selecting mode MMC High Speed (26MHz) (freq : 26 MHz) clock is enabled (25000000Hz) filename=backup.img ** Unable to read file backup.img ** fs_read backup.img failed copy_form_sd failed jdboot - goto jd boot Usage: jdboot => printenv baudrate=115200 bootcmd=jdboot bootcount=1 bootdelay=2 bootlimit=3 ipaddr=192.168.68.1 netmask=255.255.255.0 serverip=192.168.68.10 stderr=uartlite0@1e000c00 stdin=uartlite0@1e000c00 stdout=uartlite0@1e000c00 Environment size: 209/65532 bytes
连接ttl之后串口如上,无法输入命令,但是呢无法输入不代表不能进入uboot,按下reset之后上电即可在串口中输入命令, 完整操作过程如下:
降级解锁ssh
 1=> mtkupgrade
 2
 3Available parts to be upgraded:
 4    0 - Bootloader
 5    1 - Bootloader (Advanced)
 6    2 - Firmware
 7
 8Select a part: 2
 9
10*** Upgrading Firmware ***
11
12Available load methods:
13    0 - TFTP client (Default)
14    1 - Xmodem
15    2 - Ymodem
16    3 - Kermit
17    4 - S-Record
18
19Select (enter for default): 0
20
21Input U-Boot's IP address: 192.168.68.1
22Input TFTP server's IP address: 192.168.68.10
23Input IP netmask: 255.255.255.0
24Input file name: JDCOS.bin
25
26Using eth@1e100000 device
27TFTP from server 192.168.68.10; our IP address is 192.168.68.1
28Filename 'JDCOS.bin'.
29Load address: 0x80010000
30Loading: T #################################################################
31         #################################################################
32         #################################################################
33         #################################################################
34         #################################################################
35         #################################################################
36         #################################################################
37         #################################################################
38         #################################################################
39         #################################################################
40         #################################################################
41         #################################################################
42         #################################################################
43         #################################################################
44         #################################################################
45         #######################################
46         1.6 MiB/s
47done
48Bytes transferred = 14877400 (e302d8 hex)
49
50*** Loaded 14877400 (0xe302d8) bytes at 0x80010000 ***
51
52SF: Detected whxx25q128 with page size 256 Bytes, erase size 64 KiB, total 16 MiB
53
54Erasing from 0x90000 to 0xecffff, size 0xe40000 ... OK
55Writting from 0x80010000 to 0x90000, size 0xe302d8 ... OK
56
57*** Firmware upgrade completed! ***
先升级
JDCOS.bin(JDC03-3.1.1.r1911), 此版本网页登录解锁ssh,然后备份分区,刷写ubootu-boot-mt7621-68.bin
备份分区,刷uboot
 $.ajax({
    url: 'http://' + $.cookie("HostAddrIP") + '/jdcapi',
    async: false,
    data: JSON.stringify({
        jsonrpc: "2.0",
        id: 1,
        method: "call",
        params: [
            $.cookie("sessionid"),
            "service",
            "set",
            {
                "name": "dropbear",
                "instances": {"instance1": {"command": ["/usr/sbin/dropbear"]}}
            }
        ]
    }),
    dataType: 'json',
    type: 'POST'
})
root@JDBoxV3:/tmp/123# cat /proc/mtd
dev:    size   erasesize  name
mtd0: 00040000 00010000 “Bootloader”
mtd1: 00010000 00010000 “Config”
mtd2: 00040000 00010000 “Factory”
mtd3: 00f70000 00010000 “firmware”
mtd4: 003c0000 00010000 “kernel”
mtd5: 00bb0000 00010000 “rootfs”
mtd6: 00140000 00010000 “rootfs_data”
dd if=/dev/mtd0 of=/tmp/123/mtd0_bk.bin
dd if=/dev/mtd1 of=/tmp/123/mtd1_bk.bin
dd if=/dev/mtd2 of=/tmp/123/mtd2_bk.bin
dd if=/dev/mtd3 of=/tmp/123/mtd3_bk.bin
dd if=/dev/mtd4 of=/tmp/123/mtd4_bk.bin
dd if=/dev/mtd5 of=/tmp/123/mtd5_bk.bin
dd if=/dev/mtd6 of=/tmp/123/mtd6_bk.bin
root@JDBoxV3:/tmp/123# mtd write u-boot-mt7621-68.bin /dev/mtd0
Unlocking /dev/mtd0 …
Writing from u-boot-mt7621-68.bin to /dev/mtd0 …
root@JDBoxV3:/tmp/123#
root@JDBoxV3:/tmp/123#reboot
刷openwrt
重新进入uboot,按键joy上电,进入uboot,网线直连lan口,打开192.168.68.1
然后选择sysupgrade.bin文件刷openwrt
刷原厂固件
- 直接进入uboot升级原厂固件,如JDC03-3.1.1.r1911
- 把之前备份的分区文件重新刷回
ipk下载
 1# 版本架构
 2uname -a
 3opkg print-architecture
 4cat /proc/cpuinfo
 5
 6# 根据需要修改版本架构等
 7https://downloads.openwrt.org/releases/packages-23.05/mipsel_24kc/sha256sums
 8
 9https://downloads.openwrt.org/releases/17.01.1/targets/ramips/mt7621/packages/kmod-wireguard_4.4.61+0.0.20170115-1_mipsel_24kc.ipk
10https://downloads.openwrt.org/releases/17.01.1/packages/mipsel_24kc/base/iperf3_3.1.4-1_mipsel_24kc.ipk
11
12https://downloads.openwrt.org/snapshots/targets/
13
14https://dl.openwrt.ai/packages-23.05/mipsel_24kc/packages/
定制固件 immortalwrt, 如型号:re-cp-02,版本:23.05.6
immortalwrt-23.05.6-bf550ba2533a-ramips-mt7621-jdcloud_re-cp-02-squashfs-sysupgrade.bin
/etc/distfeeds.conf
src/gz immortalwrt_core https://mirrors.vsean.net/openwrt/releases/23.05.6/targets/ramips/mt7621/packages src/gz immortalwrt_base https://mirrors.vsean.net/openwrt/releases/23.05.6/packages/mipsel_24kc/base src/gz immortalwrt_kmods https://mirrors.vsean.net/openwrt/releases/23.05.6/targets/ramips/mt7621/kmods/5.15.189-1-d57570949c8e4ee79b82936a52c330d9 src/gz immortalwrt_luci https://mirrors.vsean.net/openwrt/releases/23.05.6/packages/mipsel_24kc/luci src/gz immortalwrt_packages https://mirrors.vsean.net/openwrt/releases/23.05.6/packages/mipsel_24kc/packages src/gz immortalwrt_routing https://mirrors.vsean.net/openwrt/releases/23.05.6/packages/mipsel_24kc/routing src/gz immortalwrt_telephony https://mirrors.vsean.net/openwrt/releases/23.05.6/packages/mipsel_24kc/telephony校验关闭 /etc/opkg.conf 文件中删除 option check_signature
kernel依赖问题,可以通过升级kernel解决,但是lsmod可能还是找不到
FAQ
数据转发异常
分析配置port的流量,转发的ip是否正确,以及iptable的配置,数据流向是否正确
tcpdump -i any udp port 12345
tcpdump -i eth2 host 172.22.22.12 -w test.pcap

conntrack -L | grep 12345 # 连接查看
conntrack -D -p udp --sport 12345
conntrack -D -p udp --dport 12345

iptables-save               > iptables-backup.txt
iptables -t filter -L -n    > filter.txt
iptables -t nat -L -n       > nat.txt
iptables -t mangle -L -n    > mangle.txt
iptables -t raw -L -n       > raw.txt
iptables -t security -L -n  > security.txt
DNS
/etc/systemd/resolved.conf
[Resolve]
DNS=1.1.1.1
FallbackDNS=8.8.8.8
DNSStubListener=no
sudo systemctl restart systemd-resolved
评论